Overlays trong AEM 6.5
Nguồn học chính: Overlays | Luca Nerlich. Note này viết lại bằng tiếng Việt để mình đọc, ôn và áp dụng cho AEM 6.5 on-premise.
Ý chính cần nhớ
Overlay là cơ chế custom hoặc mở rộng UI có sẵn của AEM mà không sửa trực tiếp trong /libs.
Thay vì chỉnh product node dưới /libs, mình tạo lại cùng path dưới /apps. Khi runtime request resource, Sling Resource Merger sẽ merge node ở /apps với node tương ứng ở /libs.
Ví dụ:
/libs/cq/core/content/nav
        |
        | overlay same path
        v
/apps/cq/core/content/navKết quả là AEM vẫn giữ product default trong /libs, còn phần custom của mình nằm trong /apps và có precedence cao hơn.
Overlay thường dùng để custom Touch UI:
- Ẩn hoặc thêm item trong AEM start navigation
- Custom columns trong Sites console
- Thay đổi field, label, default value trong product dialog
- Thêm tab vào page properties
- Custom toolbar action trong page editor
- Mở rộng asset finder side panel
Sling Resource Merger hoạt động thế nào
Khi một resource được resolve, Sling kiểm tra theo thứ tự:
| Tình huống | Kết quả |
|---|---|
Node chỉ có trong /libs | Dùng product default |
Node chỉ có trong /apps | Thêm vào merged result |
Node có cả trong /libs và /apps | Properties được merge, /apps thắng nếu trùng tên |
Node trong /apps có sling:hideResource=true | Ẩn toàn bộ node khỏi merged result |
Node trong /apps có sling:hideChildren | Ẩn các child nodes được chỉ định |
Node trong /apps có sling:hideProperties | Ẩn các properties được chỉ định |
Node trong /apps có sling:orderBefore | Điều khiển thứ tự node so với sibling |
Các property quan trọng
| Property | Type | Mục đích |
|---|---|---|
sling:hideResource | Boolean | Ẩn node hiện tại khỏi merged result |
sling:hideChildren | String[] | Ẩn một số child node theo tên, ví dụ [decorative,linkURL] |
sling:hideProperties | String[] | Ẩn một số property khỏi merged result |
sling:orderBefore | String | Đặt node hiện tại đứng trước sibling được chỉ định |
Ghi nhớ: overlay không có nghĩa là copy toàn bộ
/libs. Mình chỉ tạo lại phần path đủ để Resource Merger đi tới node cần thay đổi.
Tạo overlay
Cách nhanh trong CRXDE Lite
- Mở CRXDE Lite.
- Đi tới node trong
/libs, ví dụ/libs/cq/core/content/nav. - Right-click node và chọn Overlay Node.
- Xác nhận target path, ví dụ
/apps/cq/core/content/nav. - CRXDE tạo structure tương ứng dưới
/apps. - Chỉnh overlay node theo nhu cầu.
Cách đúng cho project code
Trong AEM Maven project, overlay cần nằm dưới ui.apps:
ui.apps/src/main/content/jcr_root/
└── apps/
    └── cq/
        └── core/
            └── content/
                └── nav/
└── .content.xmlVà phải thêm path vào filter.xml:
<!-- ui.apps/src/main/content/META-INF/vault/filter.xml -->
<filter root="/apps/cq/core/content/nav" mode="merge"/>Quan trọng
Overlay path nên dùng mode="merge". Nếu dùng default mode="replace", package deploy có thể xóa các product nodes không có trong overlay của mình và làm hỏng UI.
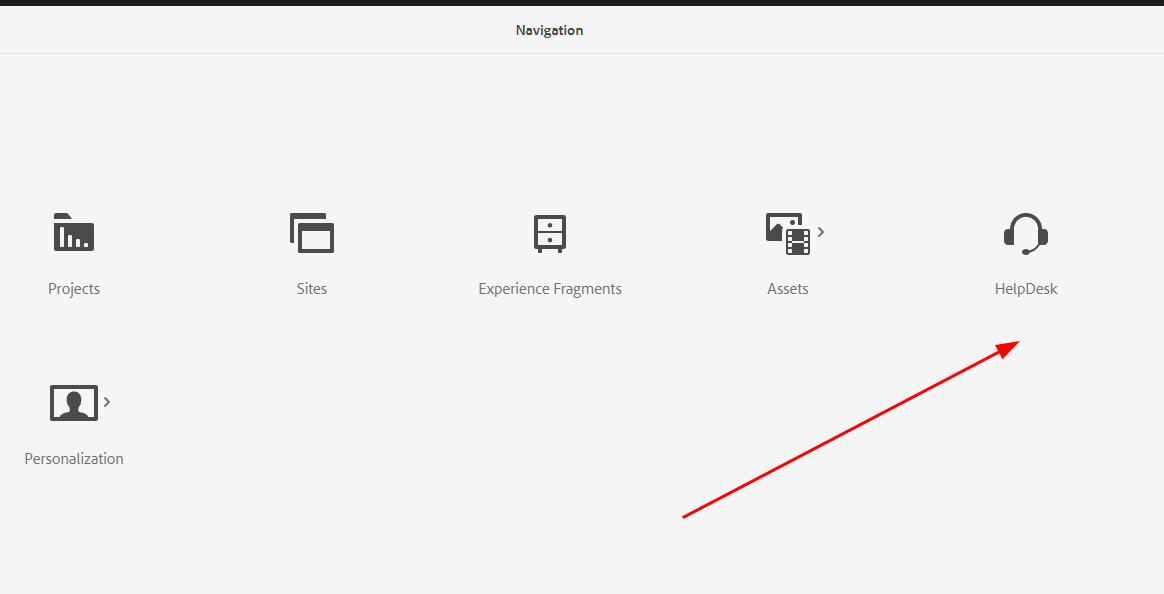
Ví dụ 1: Ẩn item trong AEM main navigation
Mục tiêu: ẩn các item không dùng trong AEM start page:
http://localhost:4502/aem/start.htmlOverlay path:
ui.apps/.../apps/cq/core/content/nav/.content.xml<?xml version="1.0" encoding="UTF-8"?>
<jcr:root xmlns:jcr="http://www.jcp.org/jcr/1.0"
xmlns:nt="http://www.jcp.org/jcr/nt/1.0"
xmlns:sling="http://sling.apache.org/jcr/sling/1.0"
jcr:primaryType="nt:unstructured"
id="root">
<projects
jcr:primaryType="nt:unstructured"
sling:hideResource="{Boolean}true"/>
<screens
jcr:primaryType="nt:unstructured"
sling:hideResource="{Boolean}true"/>
<personalization
jcr:primaryType="nt:unstructured"
sling:hideResource="{Boolean}true"/>
<commerce
jcr:primaryType="nt:unstructured"
sling:hideResource="{Boolean}true"/>
<communities
jcr:primaryType="nt:unstructured"
sling:hideResource="{Boolean}true"/>
</jcr:root>Cách tìm node name: inspect /libs/cq/core/content/nav trong CRXDE Lite.
Ví dụ 2: Thêm custom navigation button
Mục tiêu: thêm nút HelpDesk vào AEM homepage navigation.
<?xml version="1.0" encoding="UTF-8"?>
<jcr:root xmlns:jcr="http://www.jcp.org/jcr/1.0"
          xmlns:nt="http://www.jcp.org/jcr/nt/1.0"
    jcr:primaryType="nt:unstructured">

    <helpdesk
        jcr:primaryType="nt:unstructured"
        jcr:title="HelpDesk"
        href="https://support.mycompany.com"
        icon="callCenter"
        order="{Long}1600"
        target="_blank"/>
</jcr:root>order quyết định vị trí hiển thị. Số nhỏ hơn thường hiện trước. Muốn chọn đúng vị trí thì inspect order của các item đang có trong /libs/cq/core/content/nav.
Ví dụ 3: Custom Sites console columns
Mục tiêu: ẩn column Published và thêm custom column Template trong Sites console list view.
Overlay path:
ui.apps/.../apps/cq/core/content/sites/jcr:content/views/list/columns/.content.xml<?xml version="1.0" encoding="UTF-8"?>
<jcr:root xmlns:jcr="http://www.jcp.org/jcr/1.0"
xmlns:nt="http://www.jcp.org/jcr/nt/1.0"
xmlns:sling="http://sling.apache.org/jcr/sling/1.0"
jcr:primaryType="nt:unstructured">
<!-- Hide the "Published" column -->
<published
jcr:primaryType="nt:unstructured"
sling:hideResource="{Boolean}true"/>
<!-- Add a custom column -->
<template
jcr:primaryType="nt:unstructured"
jcr:title="Template"
sortable="{Boolean}true"
sling:orderBefore="published"/>
</jcr:root>Note cho mình: với console columns, cần kiểm tra thêm resource type / renderer của column nếu muốn column thật sự hiển thị data custom, không chỉ title.
Ví dụ 4: Overlay một dialog field
Mục tiêu: thay đổi label và required state của field alt trong Core Component Image dialog.
Overlay path ví dụ:
ui.apps/.../apps/core/wcm/components/image/v3/image/_cq_dialog/.content.xmlPartial XML:
<?xml version="1.0" encoding="UTF-8"?>
<jcr:root xmlns:jcr="http://www.jcp.org/jcr/1.0"
          xmlns:nt="http://www.jcp.org/jcr/nt/1.0"
    jcr:primaryType="nt:unstructured">

    <content jcr:primaryType="nt:unstructured">
        <items jcr:primaryType="nt:unstructured">
            <tabs jcr:primaryType="nt:unstructured">
                <items jcr:primaryType="nt:unstructured">
                    <properties jcr:primaryType="nt:unstructured">
                        <items jcr:primaryType="nt:unstructured">

                            <!-- Only override the specific field you need to change -->
                            <alt
                                jcr:primaryType="nt:unstructured"
                                fieldLabel="Accessibility Text (required)"
                                required="{Boolean}true"/>

                        </items>
                    </properties>
                </items>
            </tabs>
        </items>
    </content>
</jcr:root>Điểm quan trọng: chỉ cần include các parent nodes trên đường tới field cần đổi. Không copy toàn bộ dialog từ /libs, vì copy full dialog dễ conflict khi upgrade AEM hoặc Core Components.
Ẩn dialog fields bằng sling:hideChildren
Nếu muốn remove một vài field con khỏi inherited/overlaid dialog:
<items
    jcr:primaryType="nt:unstructured"
    sling:hideChildren="[decorative,linkURL]">
    <!-- decorative và linkURL từ /libs sẽ bị ẩn -->
</items>Ví dụ 5: Thêm tab vào Page Properties
Mục tiêu: thêm tab Social Media vào page properties dialog.
<?xml version="1.0" encoding="UTF-8"?>
<jcr:root xmlns:jcr="http://www.jcp.org/jcr/1.0"
          xmlns:nt="http://www.jcp.org/jcr/nt/1.0"
          xmlns:sling="http://sling.apache.org/jcr/sling/1.0"
    jcr:primaryType="nt:unstructured"
    jcr:title="Social Media"
    sling:resourceType="granite/ui/components/coral/foundation/container"
    sling:orderBefore="cloudservices">

    <items jcr:primaryType="nt:unstructured">
        <ogTitle
            jcr:primaryType="nt:unstructured"
            sling:resourceType="granite/ui/components/coral/foundation/form/textfield"
            fieldLabel="OG Title"
            name="./ogTitle"/>

        <ogDescription
            jcr:primaryType="nt:unstructured"
            sling:resourceType="granite/ui/components/coral/foundation/form/textarea"
            fieldLabel="OG Description"
            name="./ogDescription"/>

        <ogImage
            jcr:primaryType="nt:unstructured"
            sling:resourceType="granite/ui/components/coral/foundation/form/pathfield"
            fieldLabel="OG Image"
            rootPath="/content/dam"
            name="./ogImage"/>
    </items>
</jcr:root>sling:orderBefore="cloudservices" giúp đặt tab mới trước tab Cloud Services.
Toolbar action customization
Toolbar trong AEM page editor có các action như Edit, Configure, Copy, Delete. Các action này có thể custom bằng client-side JavaScript.
Có thể inspect action đang có trong browser console:
Object.keys(Granite.author.EditorFrame.editableToolbar.config.actions);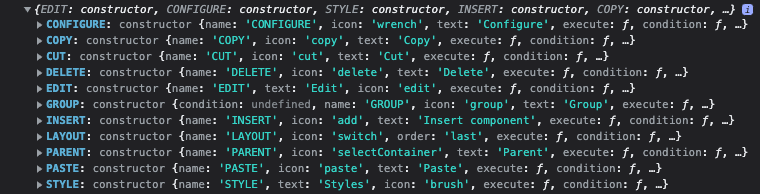
Disable Configure button cho một component cụ thể
(function($document, author) {
    'use strict';

    $document.on('cq-layer-activated', function(ev) {
        if (ev.layer === 'Edit') {
            var originalCondition =
                author.EditorFrame.editableToolbar.config.actions.CONFIGURE.condition;

            author.EditorFrame.editableToolbar.config.actions.CONFIGURE.condition =
                function(editable) {
                    if (editable &&
                            editable.config &&
                            editable.config.dialog &&
                            editable.config.dialog ===
                                '/apps/myproject/components/abstractcomponent/cq:dialog') {
                        return false;
                    }

                    return originalCondition.call(this, editable);
                };
        }
    });
})($(document), Granite.author);Disable "Convert to Building Block"
(function($document, author) {
    'use strict';

    $document.on('cq-layer-activated', function(ev) {
        if (ev.layer === 'Edit') {
            author.EditorFrame.editableToolbar.config.actions.BBCONVERT.condition =
                function() {
                    return false;
                };
        }
    });
})($(document), Granite.author);Thêm custom toolbar action
Ví dụ thêm action View Analytics:
(function($document, author) {
    'use strict';

    $document.on('cq-layer-activated', function(ev) {
        if (ev.layer === 'Edit') {
            author.EditorFrame.editableToolbar.config.actions.ANALYTICS = {
                icon: 'graphBarVertical',
                text: 'View Analytics',
                handler: function(editable) {
                    var path = editable.path;
                    window.open(
                        '/mnt/overlay/dam/gui/content/assets/analysisreport.html?path=' + path,
                        '_blank'
                    );
                },
                condition: function(editable) {
                    return editable.type === 'wcm/foundation/components/responsivegrid';
                }
            };
        }
    });
})($(document), Granite.author);Clientlib category cho toolbar customization
Các file JS authoring toolbar nên được load qua clientlib category:
cq.authoring.dialog.all- hoặc
cq.authoring.editor
<?xml version="1.0" encoding="UTF-8"?>
<jcr:root xmlns:cq="http://www.day.com/jcr/cq/1.0"
          xmlns:jcr="http://www.jcp.org/jcr/1.0"
    jcr:primaryType="cq:ClientLibraryFolder"
    categories="[cq.authoring.dialog.all]"
allowProxy="{Boolean}true"/># js.txt
#base=js
disableComponentEditing.js
hideBuildingBlocks.js
customToolbarAction.jsNote cho mình: phần này không phải overlay JCR node theo nghĩa /apps mirror /libs; đây là custom authoring behavior bằng clientlib, nhưng cùng nhóm bài vì mục tiêu vẫn là chỉnh Touch UI.
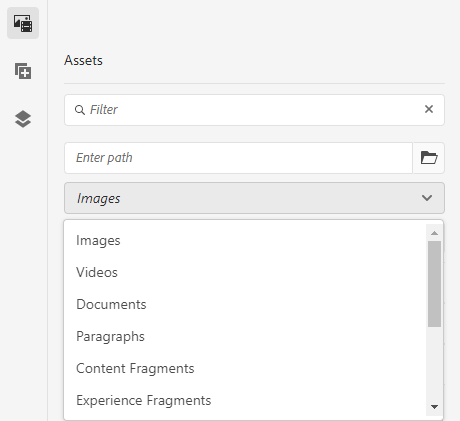
Audio Asset Finder Controller
Mặc định AEM Assets side panel không có filter riêng cho audio file. Có thể thêm một asset finder controller custom bằng clientlib thay vì overlay product JS.
Tạo audio controller
Product controllers nằm tại:
/libs/cq/gui/components/authoring/editors/clientlibs/core/js/assetControllerMình copy pattern từ videoController.js, đổi name và mimeType:
(function($, ns, channel, window, undefined) {
    'use strict';

    var self = {},
        name = 'Audio';

    self.searchRoot = '/content/dam';
    self.viewInAdminRoot = '/assetdetails.html{+item}';

    var searchPath = self.searchRoot,
        imageServlet = '/bin/wcm/contentfinder/asset/view.html',
        itemResourceType = 'cq/gui/components/authoring/assetfinder/asset';

    self.setUp = function() {};
    self.tearDown = function() {};

    self.loadAssets = function(query, lowerLimit, upperLimit) {
        var param = {
            '_dc': new Date().getTime(),
            'query': query.concat('order:"-jcr:content/jcr:lastModified" '),
            'mimeType': 'audio',
            'itemResourceType': itemResourceType,
            'limit': lowerLimit + '..' + upperLimit,
            '_charset_': 'utf-8'
        };

        return $.ajax({
            type: 'GET',
            dataType: 'html',
            url: Granite.HTTP.externalize(imageServlet) + searchPath,
            data: param
        });
    };

    self.setServlet = function(servlet) { imageServlet = servlet; };
    self.setSearchPath = function(path) { searchPath = path; };
    self.setItemResourceType = function(rt) { itemResourceType = rt; };
    self.resetSearchPath = function() { searchPath = self.searchRoot; };

    ns.ui.assetFinder.register(name, self);
}(jQuery, Granite.author, jQuery(document), this));Clientlib:
<?xml version="1.0" encoding="UTF-8"?>
<jcr:root xmlns:cq="http://www.day.com/jcr/cq/1.0"
          xmlns:jcr="http://www.jcp.org/jcr/1.0"
    jcr:primaryType="cq:ClientLibraryFolder"
    categories="[cq.authoring.dialog.all]"
allowProxy="{Boolean}true"/># js.txt
#base=js
audioController.jsSau deploy, asset finder dropdown sẽ có option Audio.
Cho phép drag-and-drop audio asset vào component
Trong _cq_editConfig.xml, thêm MIME type pattern audio/.*:
<?xml version="1.0" encoding="UTF-8"?>
<jcr:root xmlns:sling="http://sling.apache.org/jcr/sling/1.0"
          xmlns:cq="http://www.day.com/jcr/cq/1.0"
          xmlns:jcr="http://www.jcp.org/jcr/1.0"
          xmlns:nt="http://www.jcp.org/jcr/nt/1.0"
    jcr:primaryType="cq:EditConfig">

    <cq:dropTargets jcr:primaryType="nt:unstructured">
        <file
            jcr:primaryType="cq:DropTargetConfig"
            accept="[application/pdf,audio/.*,video/.*,application/zip]"
            groups="[media]"
            propertyName="./fileReference">
            <parameters
                jcr:primaryType="nt:unstructured"
                sling:resourceType="myproject/components/mycomponent"/>
        </file>
    </cq:dropTargets>

    <cq:listeners
        jcr:primaryType="cq:EditListenersConfig"
        afteredit="REFRESH_PAGE"/>
</jcr:root>audio/.* match các định dạng như MP3, WAV, OGG.
Overlay vs sling:resourceSuperType
Đây là phần dễ nhầm.
| Approach | Cơ chế | Dùng khi |
|---|---|---|
Overlay (/apps mirror /libs) | Sling Resource Merger | Chỉnh product UI: navigation, consoles, product dialogs |
sling:resourceSuperType | Component inheritance | Tạo custom component kế thừa Core/Foundation Component |
Khi nên overlay
- Ẩn navigation items
- Ẩn hoặc thêm console columns
- Thay label/default value/field properties trong product dialog
- Thêm tab vào page properties
- Thay đổi behavior của admin console
Khi nên dùng inheritance
- Tạo custom component extend Core Components hoặc Foundation Components
- Tạo container component extend responsive grid
- Thêm fields cho custom component dialog nhưng vẫn giữ behavior parent
Quy tắc cá nhân: nếu mình đang chỉnh AEM product UI có sẵn, nghĩ tới overlay. Nếu mình đang tạo component của project, ưu tiên sling:resourceSuperType.
Best practices
1. Giữ overlay nhỏ nhất có thể
Chỉ overlay node và property cần đổi.
<!-- Good: chỉ đổi một field -->
<alt
    jcr:primaryType="nt:unstructured"
    fieldLabel="Accessibility Text (required)"
required="{Boolean}true"/>Không copy cả dialog chỉ để đổi một field. Full copy sẽ dễ vỡ khi AEM/Core Components update.
2. Không overlay clientlibs trong /libs
Đừng overlay js.txt, css.txt, JS/CSS product files dưới /libs. Cách an toàn hơn là tạo clientlib riêng với category phù hợp rồi load custom code của mình.
3. Luôn dùng mode="merge" trong filter.xml
<filter root="/apps/cq/core/content/nav" mode="merge"/>mode="replace" là rủi ro lớn vì có thể remove product content không nằm trong package của mình.
4. Document overlay
Overlay khá "vô hình" vì nó chỉ thể hiện khi runtime merge. Nên document:
- Overlay path
- Product path gốc dưới
/libs - Mục đích custom
- Ai/requirement nào cần custom này
- Cách test sau deploy
5. Test sau AEM upgrade/service pack
Adobe có thể thay đổi content dưới /libs. Sau mỗi upgrade hoặc service pack, cần verify overlay vẫn merge đúng và không che mất node mới.
6. Dùng sling:orderBefore khi cần định vị
Khi thêm item mới, đừng phụ thuộc hoàn toàn vào JCR node order.
<myCustomTab
    jcr:primaryType="nt:unstructured"
    jcr:title="My Tab"
sling:orderBefore="cloudservices"/>Pitfalls thường gặp
| Vấn đề | Cách xử lý |
|---|---|
| Overlay không có tác dụng | Kiểm tra path dưới /apps match đúng /libs path, case-sensitive |
| Deploy rồi overlay không chạy | Kiểm tra filter.xml có include overlay path không |
| Navigation item vẫn hiện sau khi hide | Clear browser cache và rebuild AEM clientlibs tại /libs/granite/ui/content/dumplibs.rebuild.html |
| Overlay hỏng sau AEM upgrade | Giữ overlay minimal và test lại merged result |
filter.xml dùng mode="replace" làm mất product nodes | Đổi sang mode="merge" cho overlay paths |
| Dialog overlay merge sai | Đảm bảo tạo đủ parent node path từ root tới target field |
| Custom navigation button không hiện | Kiểm tra order hoặc dùng sling:orderBefore; so sánh với /libs/cq/core/content/nav |
| Toolbar JS không load | Kiểm tra clientlib category cq.authoring.dialog.all hoặc cq.authoring.editor |
Checklist khi mình làm overlay thật
- Xác định product node gốc dưới
/libs. - Tạo cùng path dưới
/apps, chỉ gồm node cần custom và parent path bắt buộc. - Nếu muốn ẩn node: dùng
sling:hideResource. - Nếu muốn ẩn vài child: dùng
sling:hideChildren. - Nếu thêm node mới: set title/resourceType/action cần thiết và định vị bằng
sling:orderBeforehoặc property order tương ứng. - Thêm path vào
filter.xmlvớimode="merge". - Deploy lên local AEM.
- Test UI trong author.
- Rebuild clientlibs/cache nếu custom UI chưa reflect.
- Ghi chú overlay path và lý do custom trong project docs.